Custom Forms get the paper off site. Build the form you currently fill in by hand once, attach it to a job, and your team completes it on their phone. Photos, signatures, and timestamps all live with the job, so the audit trail is permanent and nothing gets lost in a van.
Use Custom Forms for daily safety checks, RAMS sign-offs, snagging lists, pre-start checklists, client handover sheets, post-job reports, and anything else you currently capture on paper.
This guide explains how Custom Forms work, who can do what, and how to set them up.
Core Concepts
Custom Forms have three building blocks. Understanding how they relate is the key to using the feature well.
Form Template (reusable design)
        │
        │  attached to a Job (this is called an Assignment)
        ▼
Form Assignment (template + job + when it must be done)
        │
        │  filled in and sent for review
        ▼
Form Submission (one completed copy of the form)
Block | What it is | Created by | Lives forever? |
|---|---|---|---|
Form Template | The reusable design (the questions, fields, order, settings) | Owners and Admins, in Settings | Yes (or archived) |
Form Assignment | A template attached to a specific job, with rules about when it must be filled in | Account Owners, Admins, and Office Staff | Yes (or deactivated) |
Form Submission | One completed copy of the form, with the answers, photos, and signatures | The person filling the form in | Yes |
A single template can be assigned to many jobs. A single assignment can have many submissions (for example, one per clock-in). Every submission stays attached to the job it was filled in on, so the audit trail is permanent.
Who Can Do What
Access to Custom Forms is controlled by user role.
Role | Build templates | Assign to jobs | Fill forms | Review submissions |
|---|---|---|---|---|
Account Owner | Yes | Yes | Yes | Yes |
Admin | Yes | Yes | Yes | Yes |
Office Staff | View only | Yes | Yes | Yes |
Field Staff | No | No | Yes (own assignments) | No |
If a button or page is not visible to you, your account type probably doesn't have access. Speak to your account owner.
Building a Form Template
Templates are the reusable designs your team will fill in. You build them once and use them on as many jobs as you like.
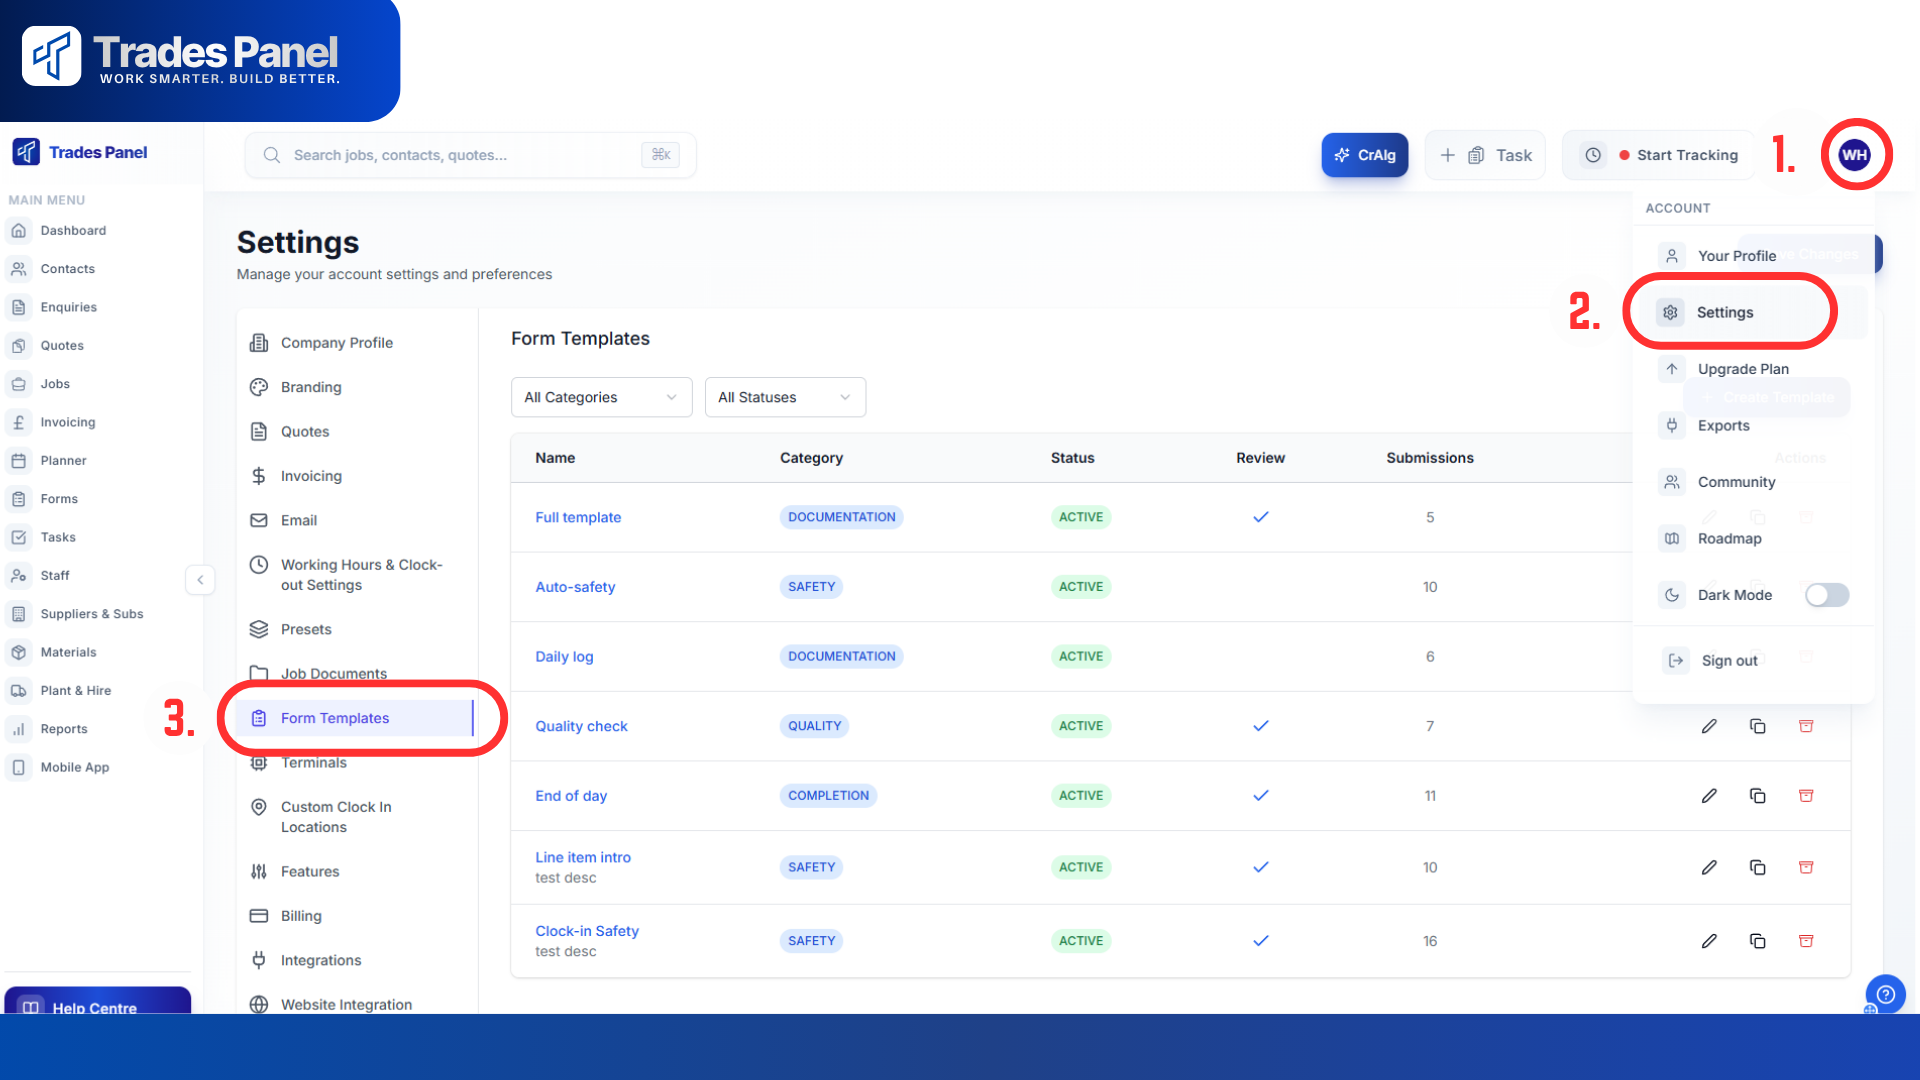
Where to find templates
Open the Trades Panel web app
Go to Settings
Open the Form Templates tab
You will see a table of every template on your account, with filters for Category and Status (Active, Draft, or Archived).
Creating a new template
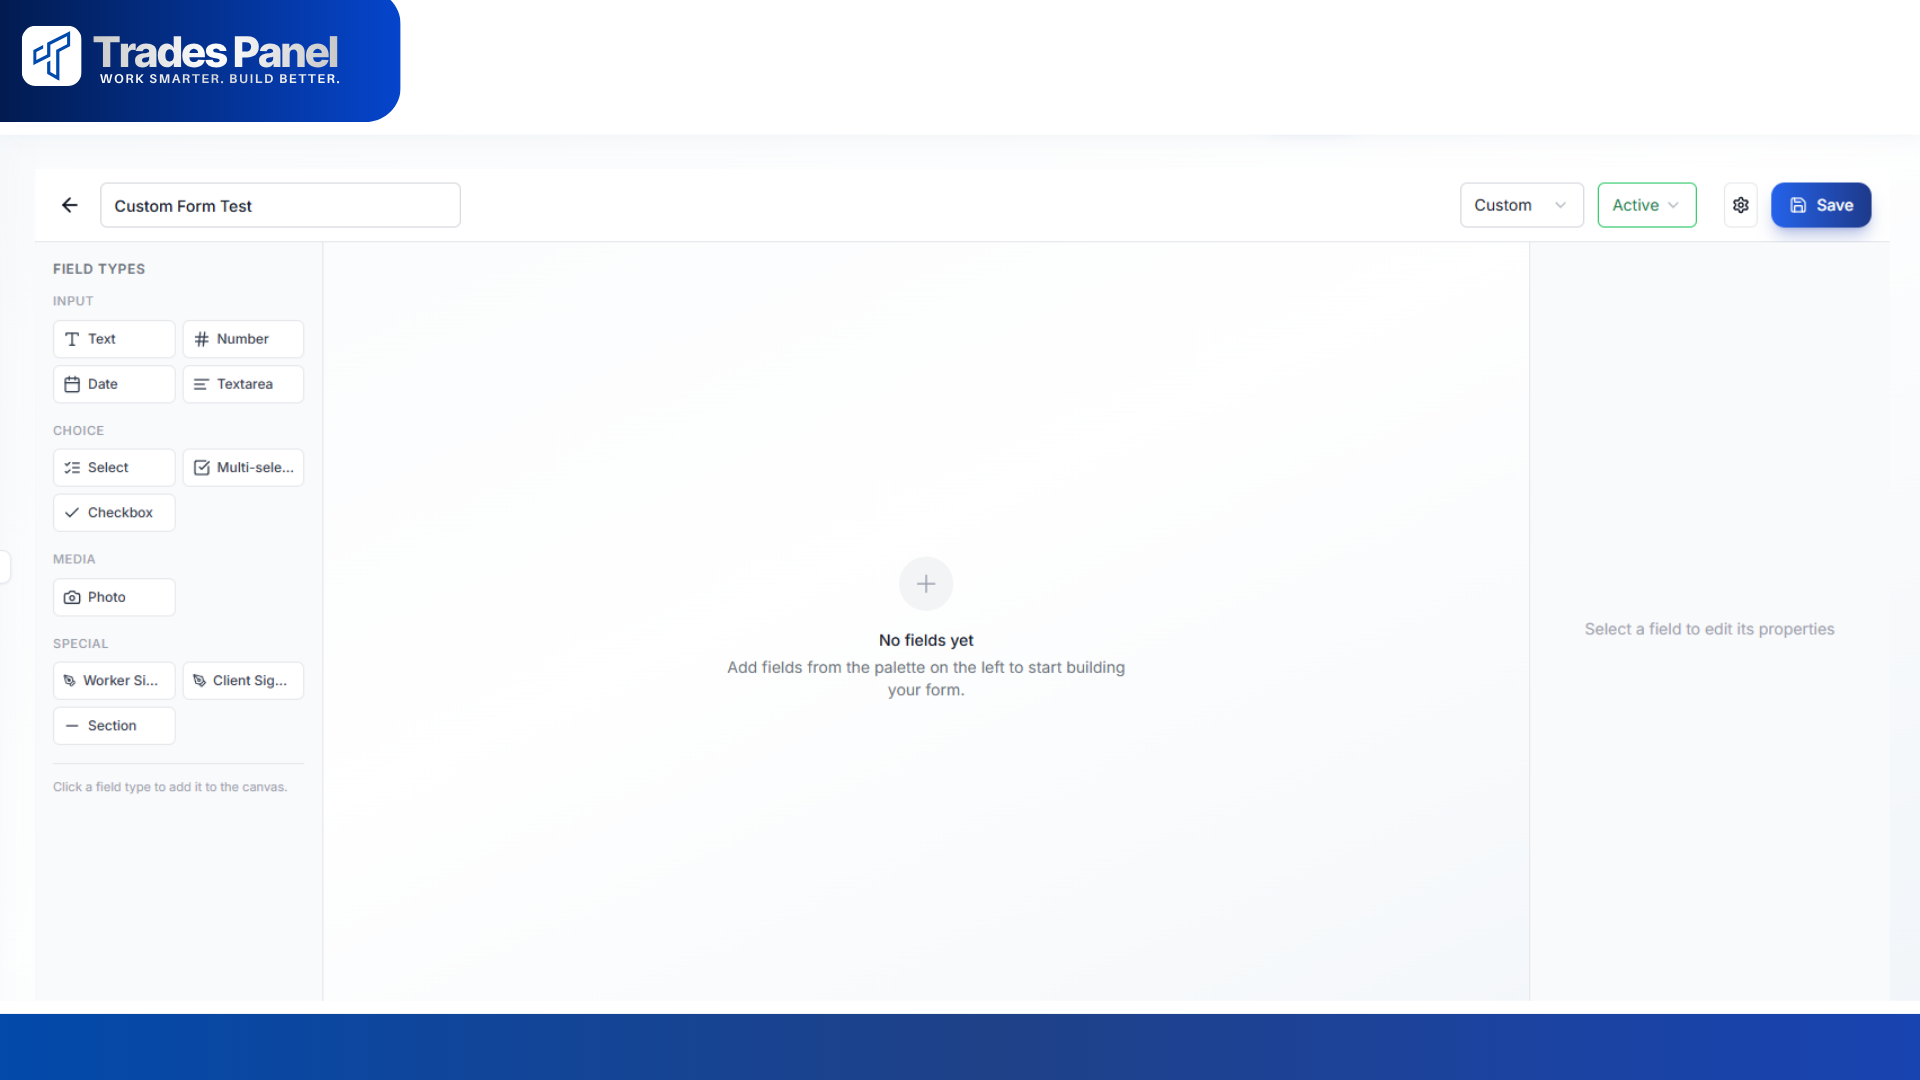
Click Create Template (top right of the Form Templates page). The template builder opens with three areas:
Left: the list of field types you can add
Middle: your form takes shape here as you add fields
Right: properties for whichever field you have selected
To build your form:
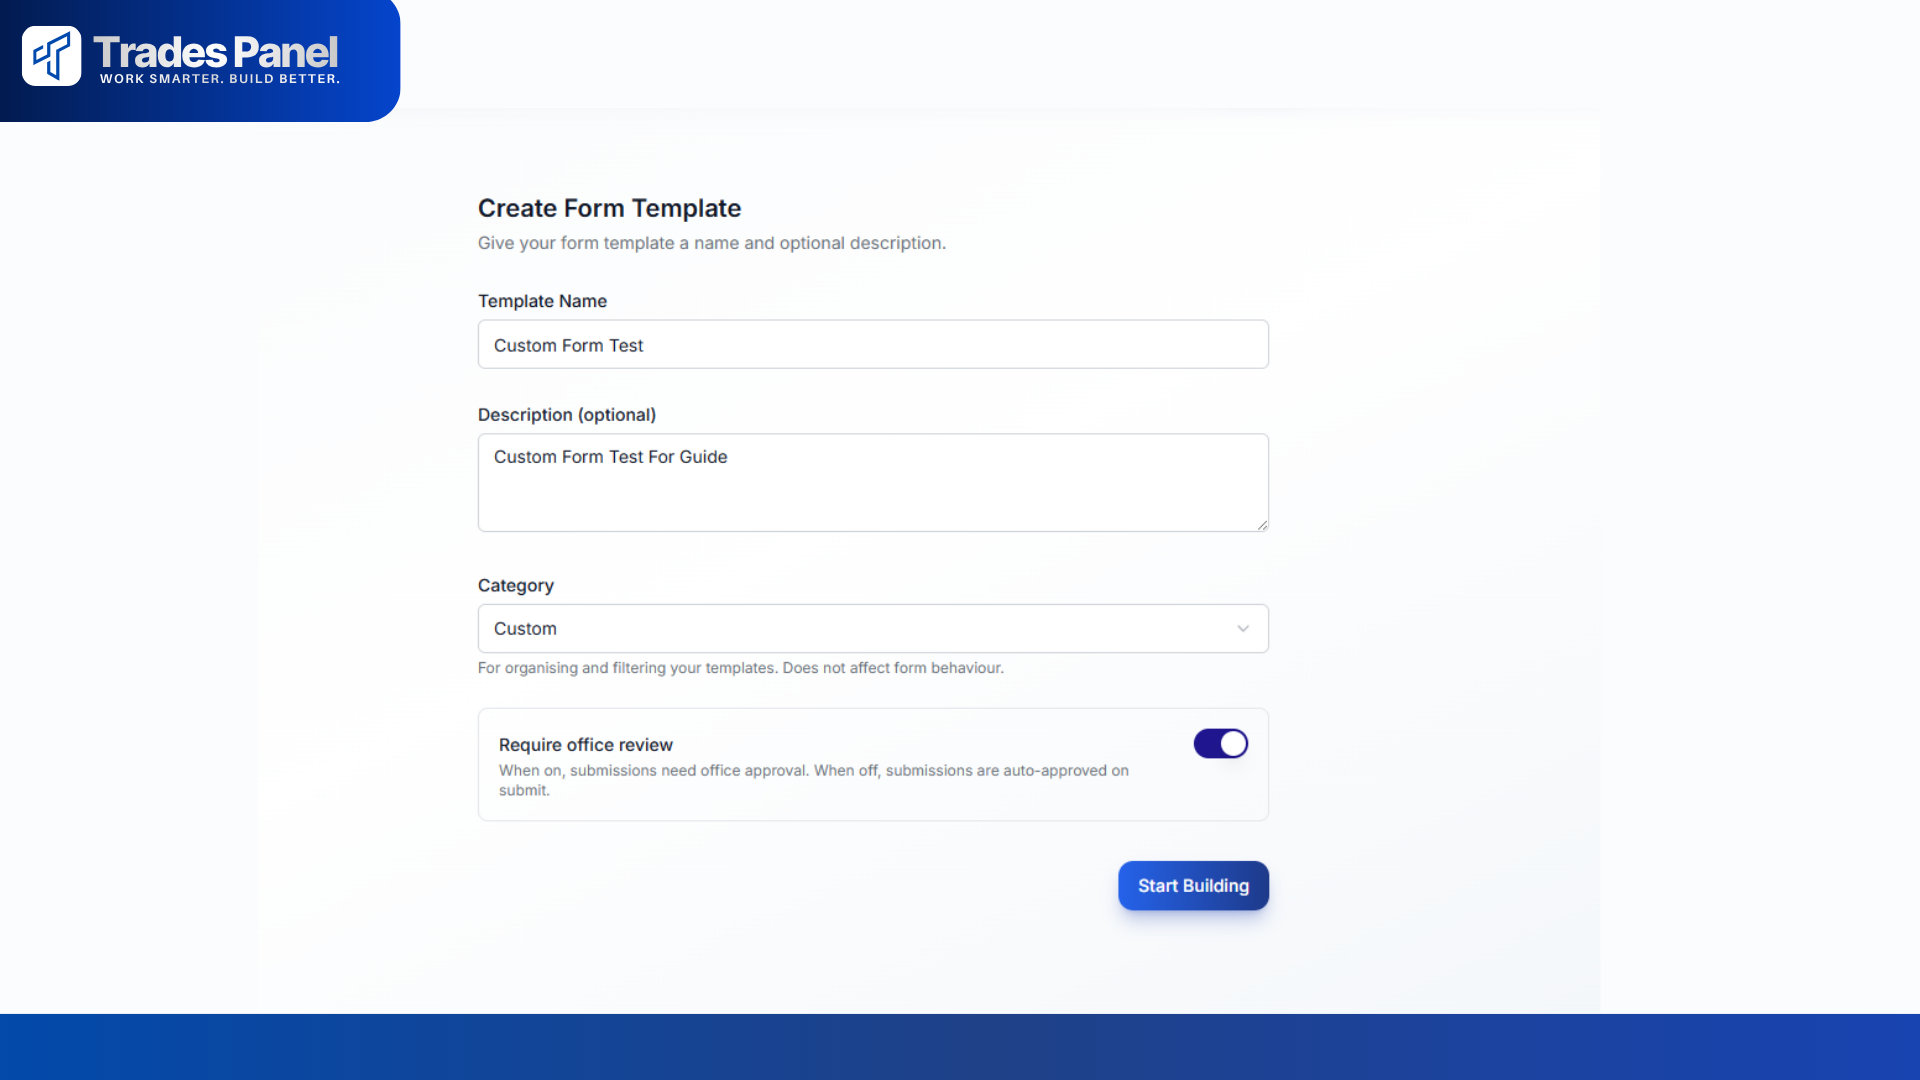
Enter a Template Name at the top (required, up to 255 characters)
Click a field type on the left to add it to your form
Click any field in the middle to select it and edit its label, description, and other settings on the right
Drag the handle on the left of any field to reorder
Click the bin icon on a field to remove it
Press Ctrl/Cmd + S or click Save at the top right
If you try to leave the page with unsaved changes, you will be warned.
Field types you can add
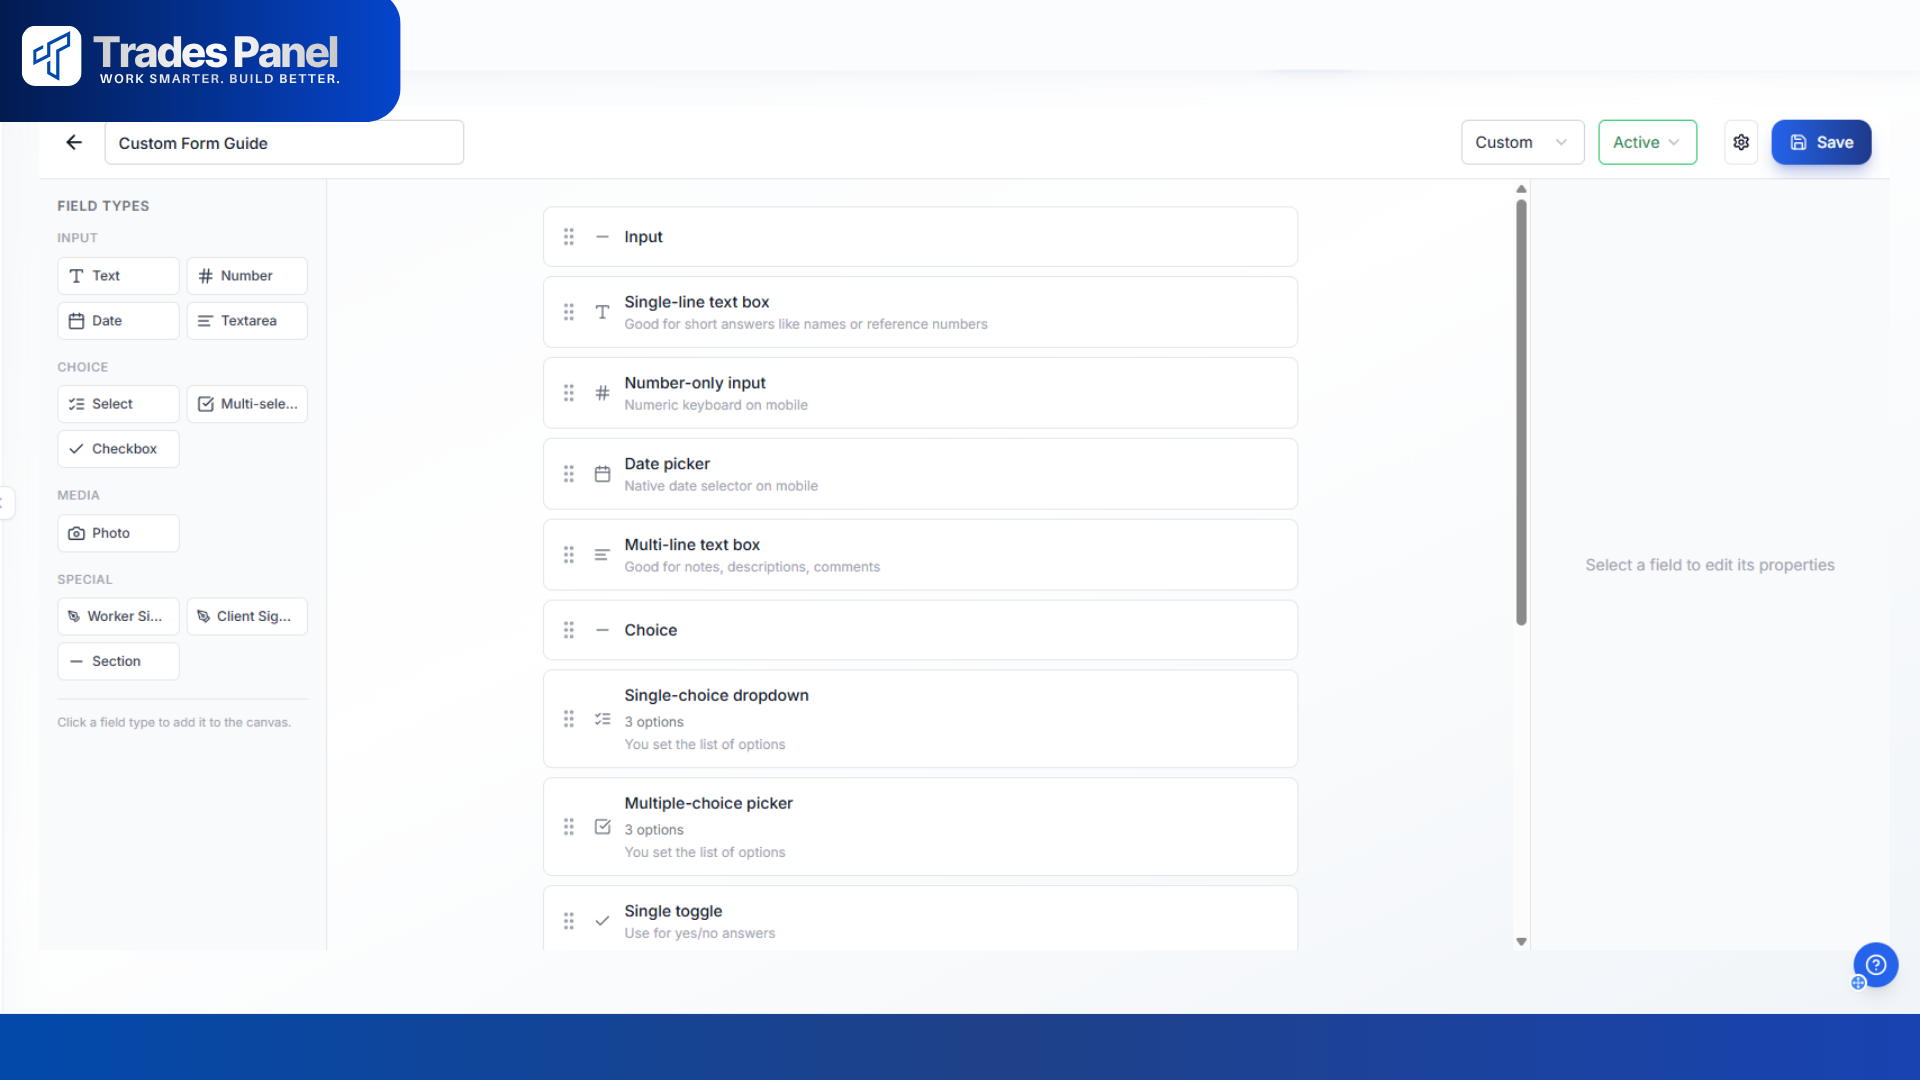
Fields in the palette are grouped into Input, Choice, Media, and Special.
Palette label | What the user sees | Notes |
|---|---|---|
Text | Single-line text box | Good for short answers like names or reference numbers |
Number | Number-only input | Numeric keyboard on mobile |
Date | Date picker | Native date selector on mobile |
Textarea | Multi-line text box | Good for notes, descriptions, comments |
Select | Single-choice dropdown | You set the list of options |
Multi-select | Multiple-choice picker | You set the list of options |
Checkbox | Single toggle | Use for yes/no answers |
Photo | Photo capture or library picker | Mobile uses camera or photo library; web uses file upload |
Worker Signature | Signature pad for your staff to sign | GPS coordinates are captured on mobile |
Client Signature | Signature pad for the customer to sign | GPS coordinates are captured on mobile |
Section | Visual divider with a title | Does not collect an answer; use to group fields |
Field properties
When you click a field on the canvas, the right panel lets you set:
Label: The question or prompt the user sees (required, up to 255 characters)
Description: Optional help text shown under the label (up to 1000 characters)
Placeholder: Hint text shown inside the input (Text, Number, Date, and Textarea fields only)
Required: Toggle to make the field mandatory before the form can be submitted
Options: For Select and Multi-select fields, the list of choices. Each option has a label your user sees and a value stored behind the scenes (the value is auto-generated from the label and can be edited)
Section fields do not have a Required toggle - they are layout, not questions.
Template settings
Click the Settings icon at the top of the builder to open the settings drawer:
Description: A longer explanation of what the form is for. Shown to the person filling it in.
Category: Tag the template as Safety, Quality, Completion, Documentation, or Custom. Used by the Category filter on the templates list.
Status:
Draft - work in progress, cannot be assigned to jobs yet
Active - live and ready to use
Archived - hidden from active lists, cannot be newly assigned, but existing assignments and submissions are preserved
Require office review: Default on.
On: submissions go to office staff for approval after they are sent in
Off: submissions are auto-approved the moment they are submitted
Limits
Up to 50 fields per template (plenty for even a long RAMS sign-off)
Template name up to 255 characters
Template description up to 2000 characters
Field label up to 255 characters
Field description up to 1000 characters
Editing, duplicating, archiving
From the Form Templates list:
Edit: opens the builder for that template
Duplicate: creates a copy with all fields and settings, ready to rename and tweak
Archive: hides the template from active lists. Existing assignments still work, but you cannot create new assignments with an archived template. You will be asked to confirm.
Restore: to find archived templates, set the Status filter to Archived. Click Restore to move a template back to Active.
Editing a template that has live assignments updates the form everywhere it is used. If you need to make changes that should not affect past jobs, duplicate the template first and edit the copy.
Assigning a Form to a Job
A template only becomes active on a job once it has been assigned. For help setting up a job, see the Creating Jobs guide.
Where to find form assignments
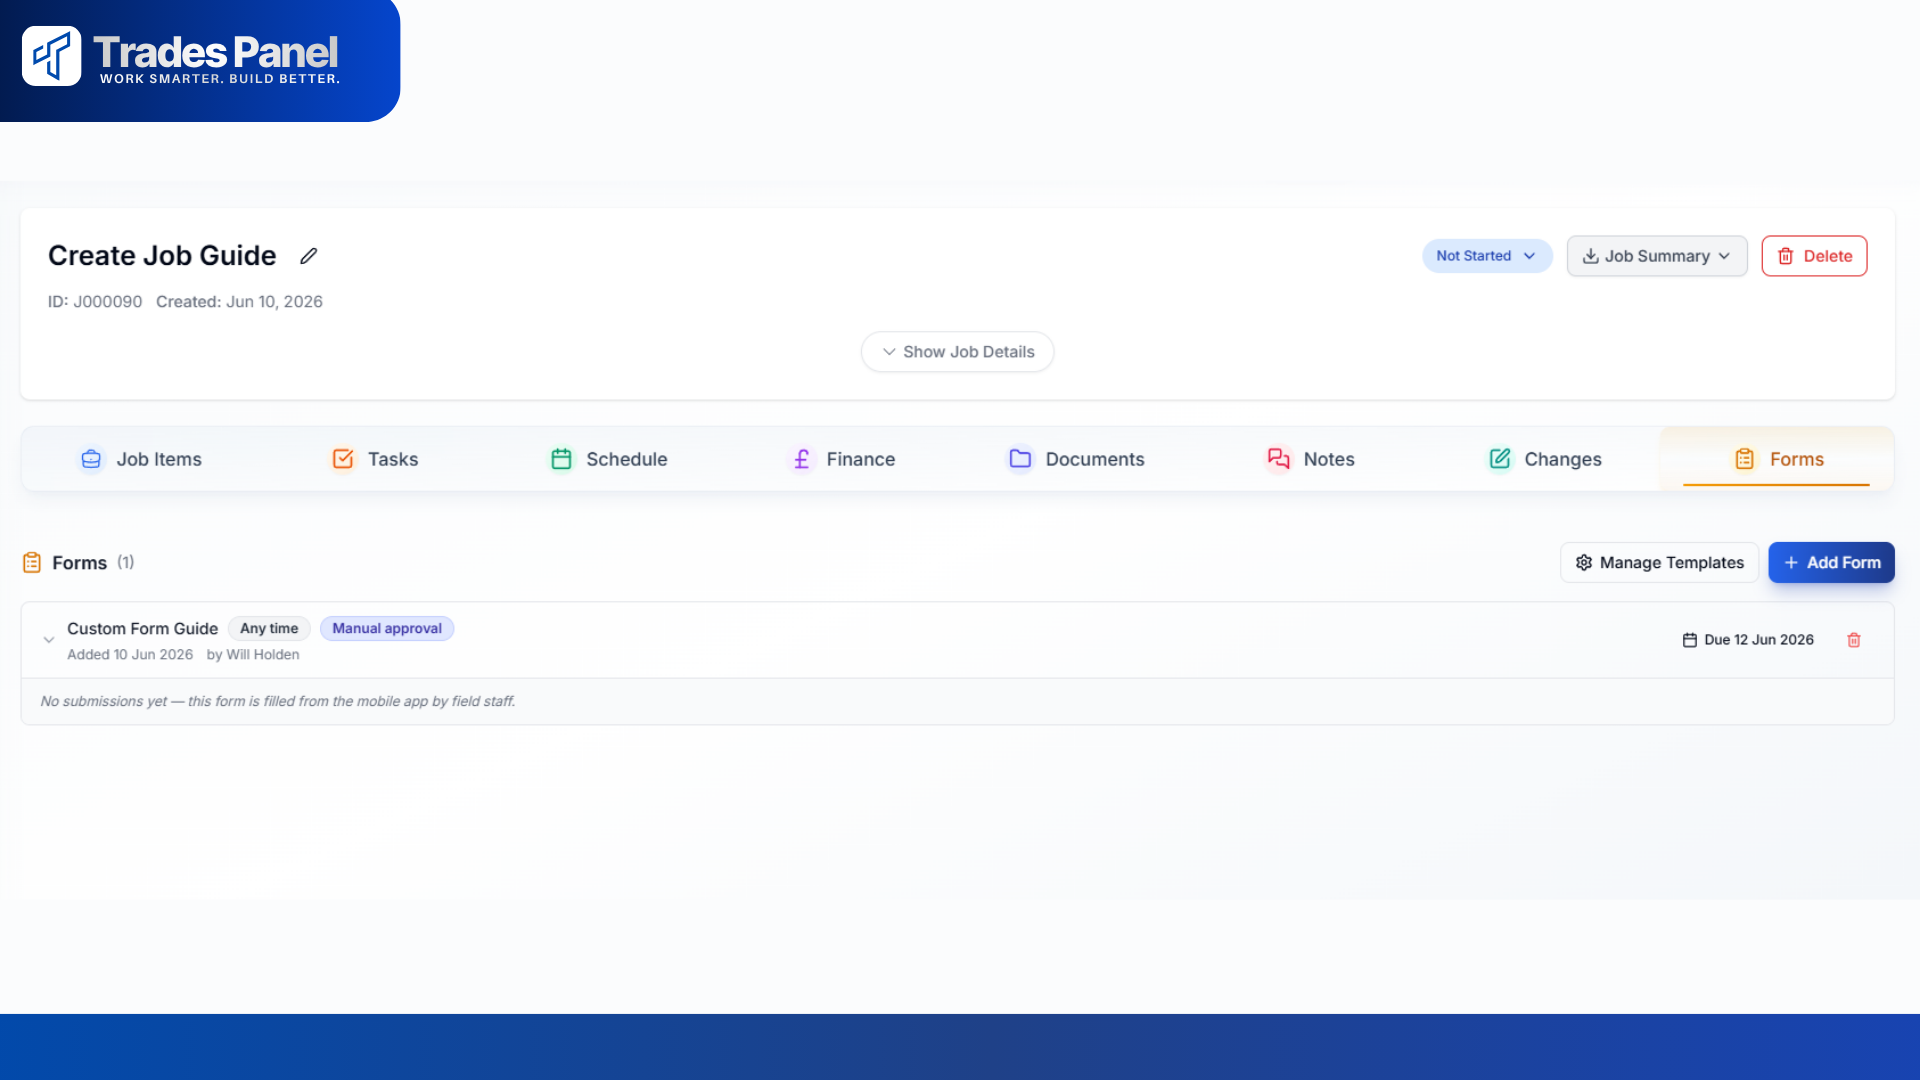
Open any Job in the web app
Click the Forms tab on the job
You will see every form that has been assigned to this job, along with its status, submissions, and any due date.
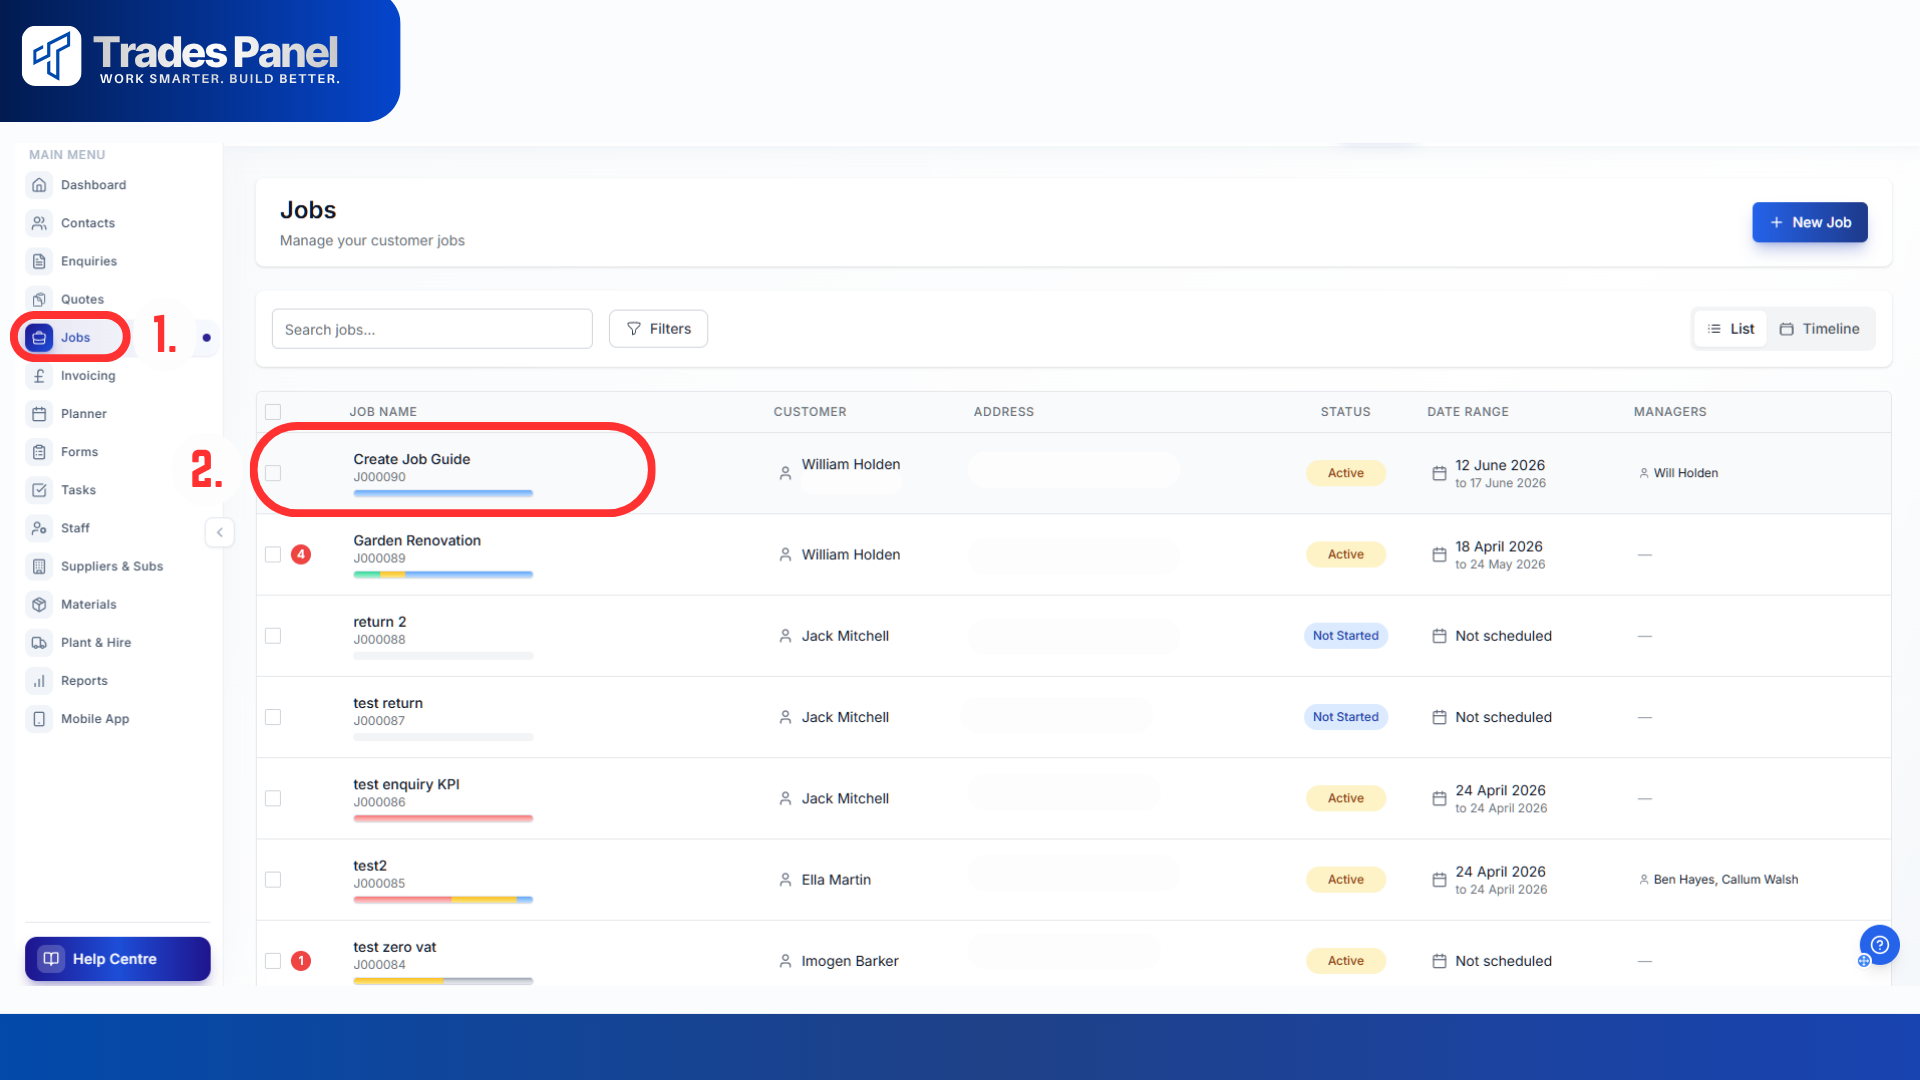
Adding a form to a job
Click Add Form at the top of the Forms tab
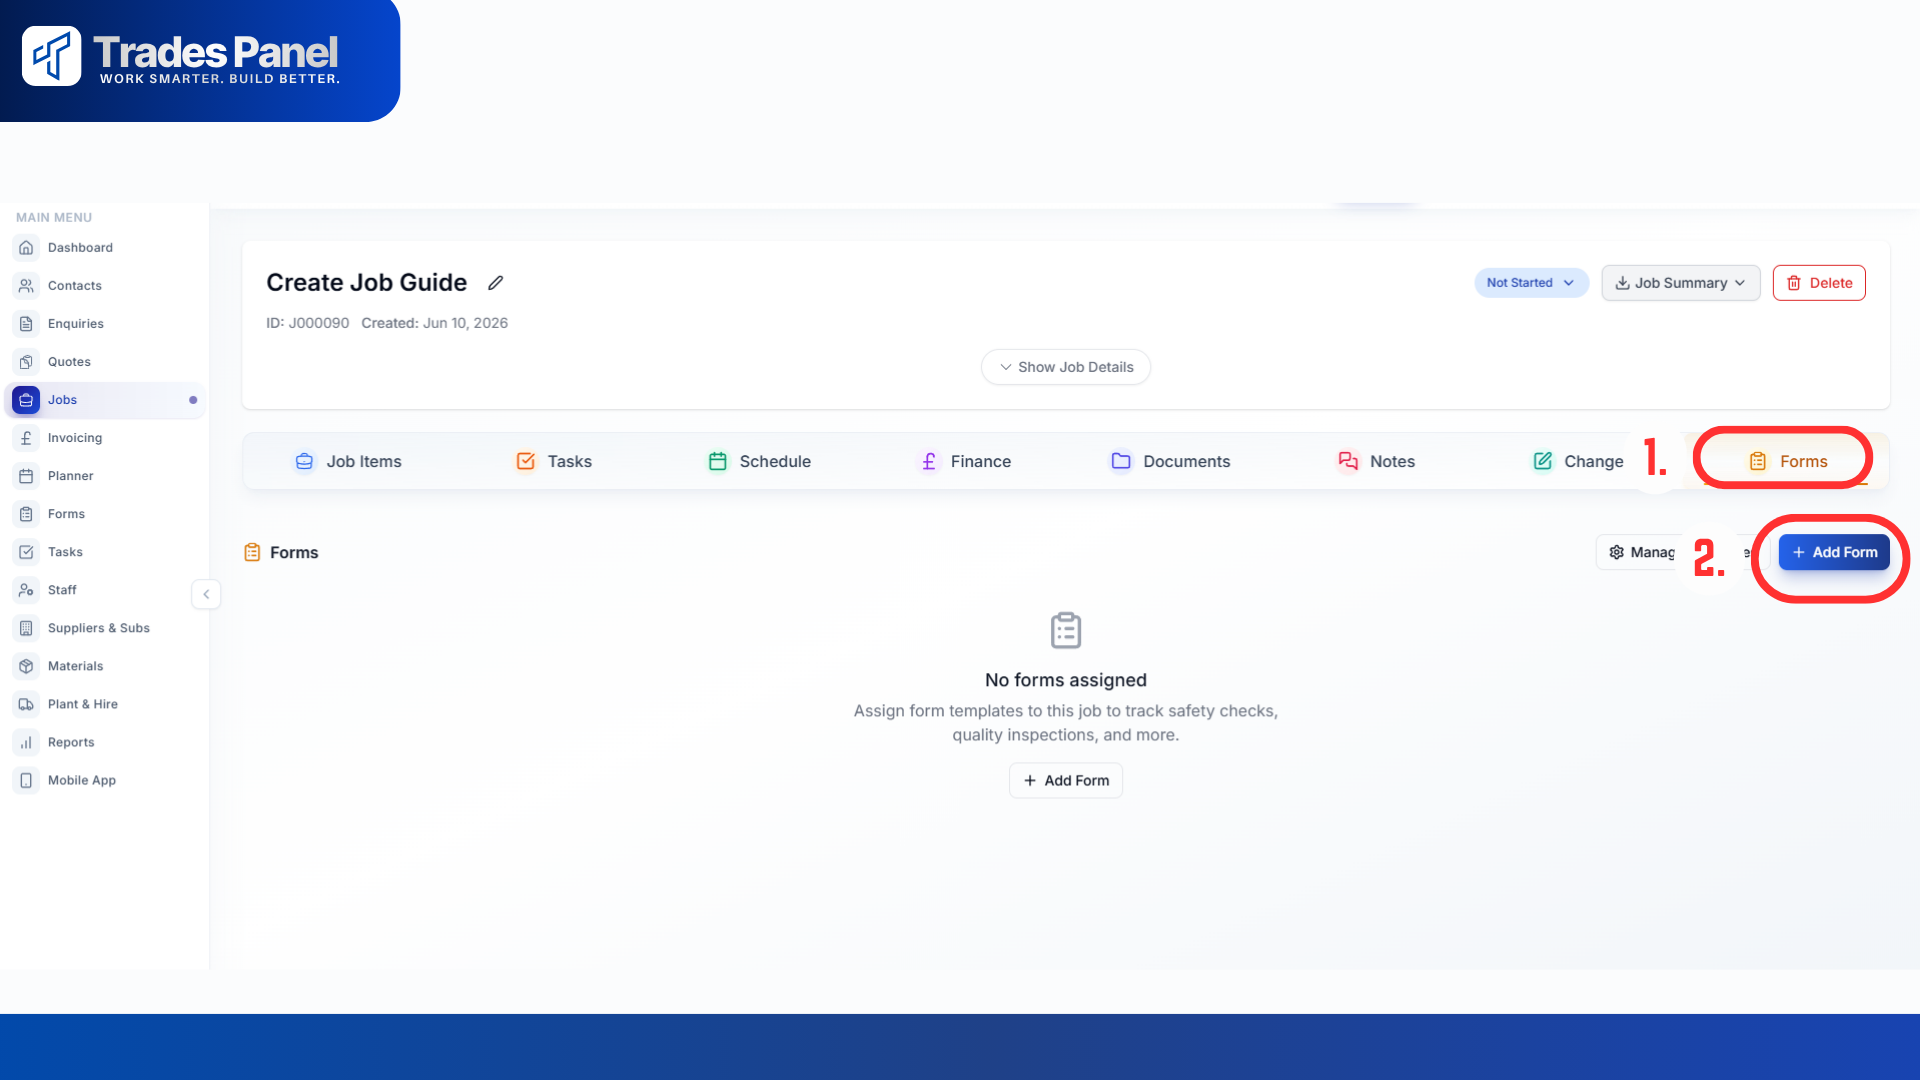
Step 1 - Choose a template: search by name and click the template you want. Only Active templates appear in the list.
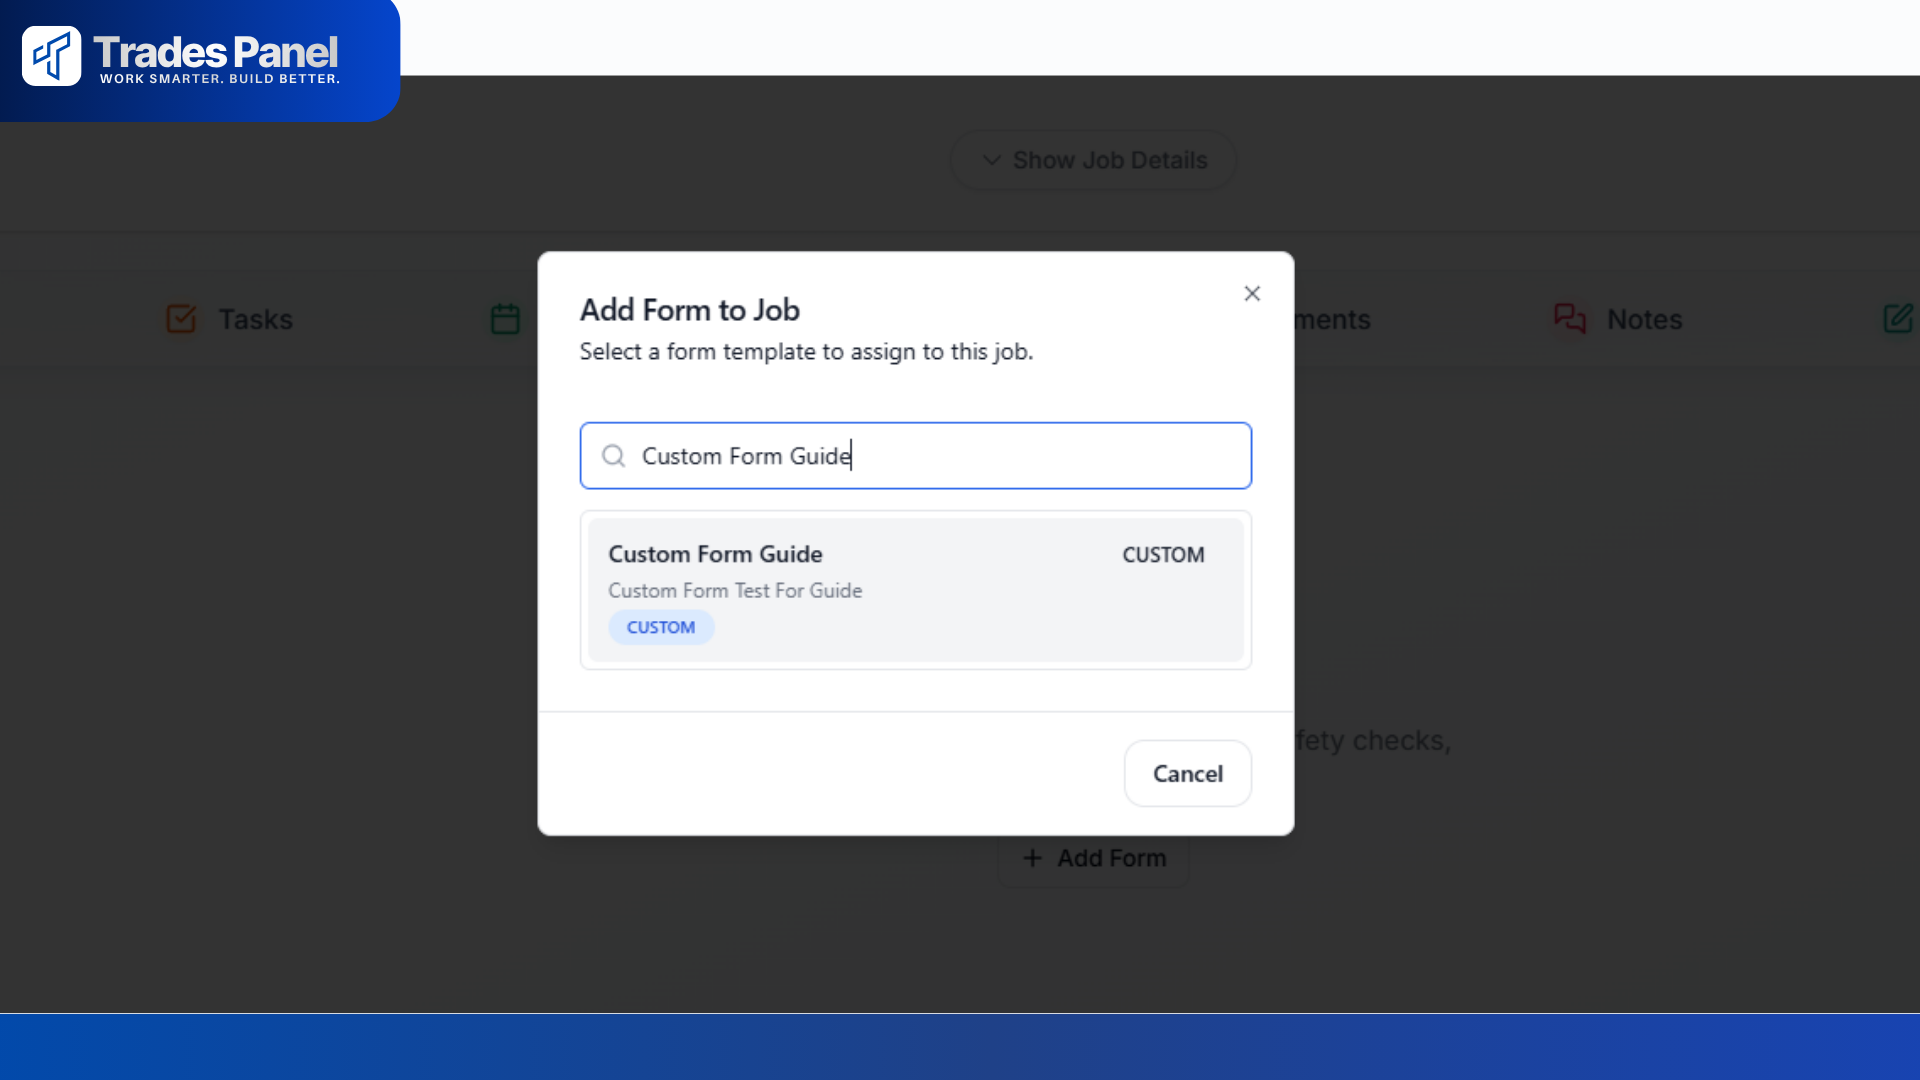
Step 2 - Configure the assignment: pick when the form must be filled in (see below), and optionally set a due date (only available when you pick "Any time").
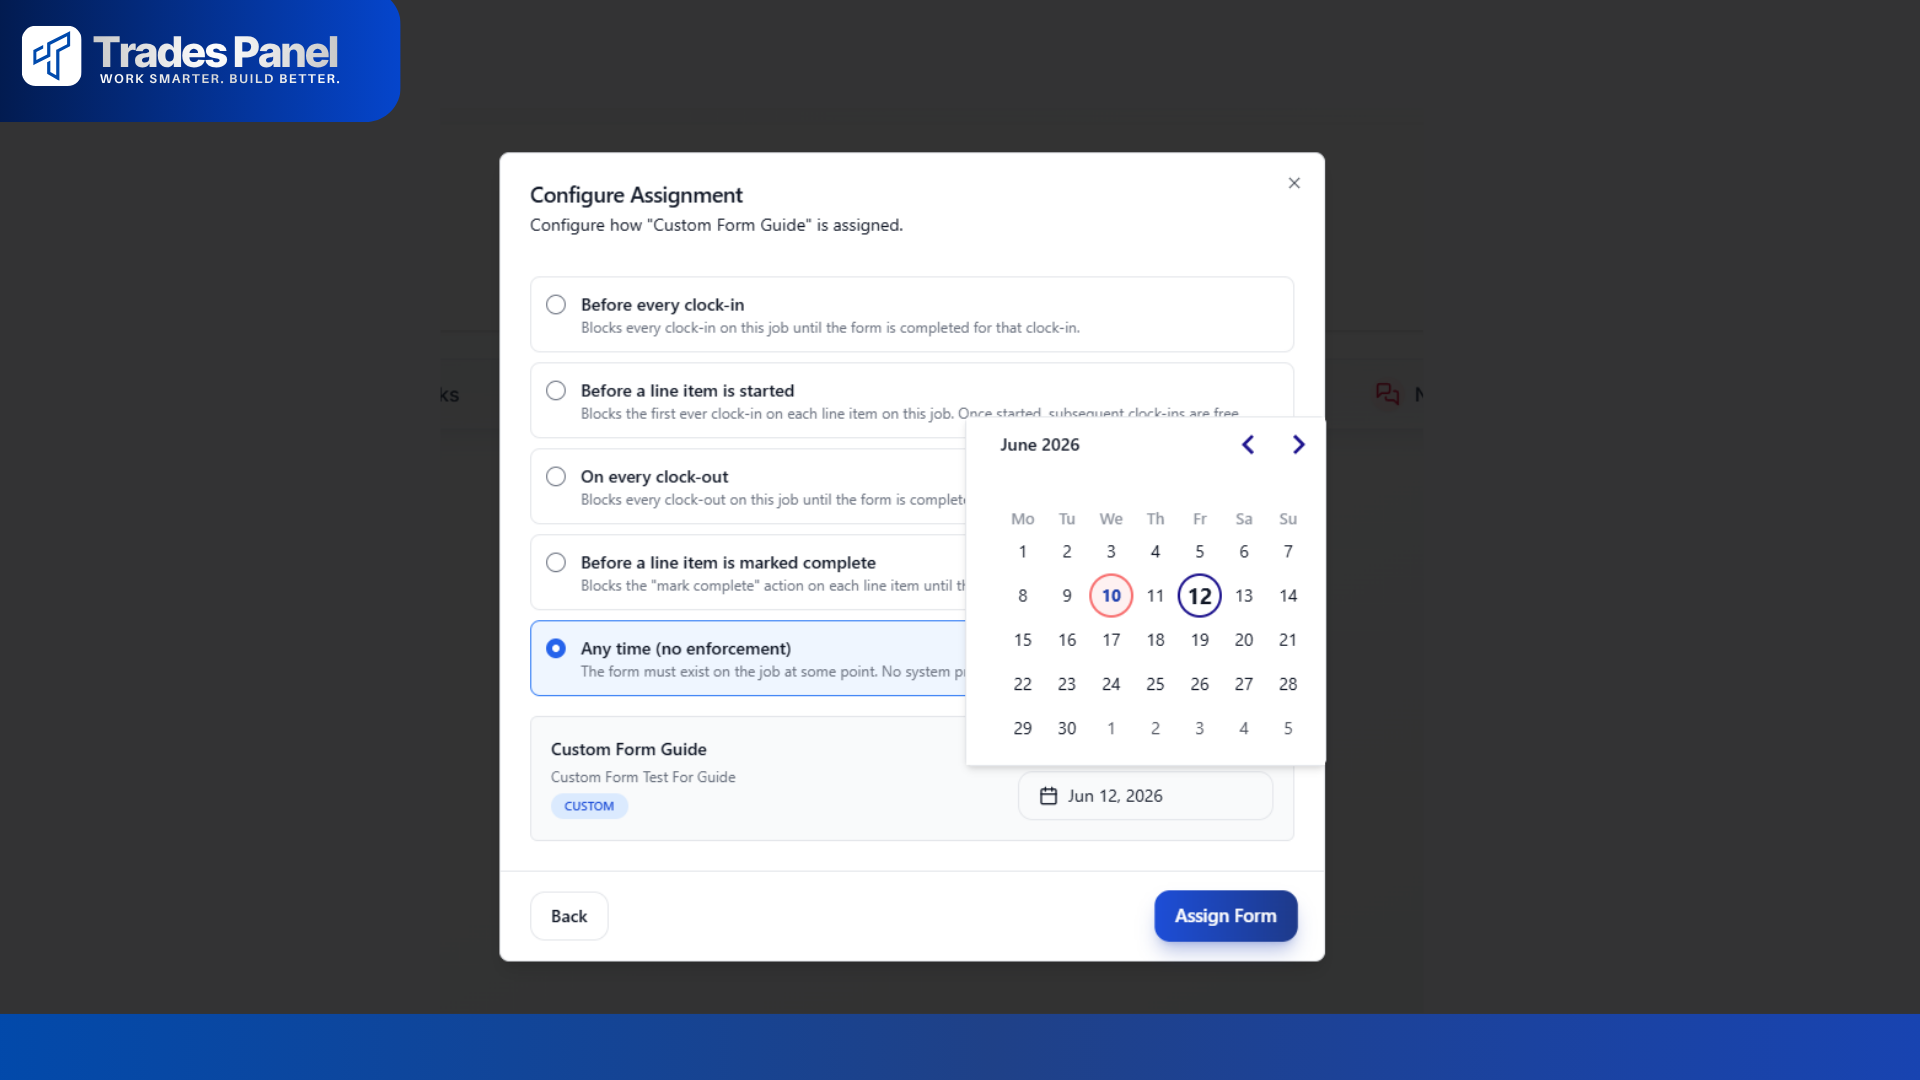
Click Assign Form
The form will appear on the job's Forms tab straight away.
When the form must be filled in
This is the most important choice on the assignment. Five options, picked as radio cards. Some of these actively block clock-in or clock-out until the form is done - we call these gated options. Choose carefully.
Option | When the form must be filled in | What is blocked | Good for |
|---|---|---|---|
Before every clock-in | Each time anyone clocks in to this job | Clock-in is blocked until the form is submitted for that clock-in | Daily pre-start safety check |
Before a line item is started | The first time anyone clocks in to a given line item on the job (line items are the individual tasks under a job - e.g. "Living Room Walls") | First clock-in on that line item is blocked; later clock-ins on the same line item are free | RAMS sign-off before a new phase of work starts |
On every clock-out | Each time anyone clocks out of this job | Clock-out is blocked until the form is submitted | End-of-day site condition report |
Before a line item is marked complete | When someone tries to mark a line item complete | The "mark complete" action is blocked until the form is submitted | Quality sign-off before the next trade is called in |
Any time (no enforcement) | Whenever the team needs to fill it in | Nothing is blocked. The form sits on the job and can be filled in on demand | Job pack, client handover sheet, post-job report |
A single template can be assigned to the same job under more than one option (for example, the same safety form on Before every clock-in and Any time). It cannot be assigned to the same job under the same option twice - you will get a duplicate error.
Due dates
A Due date can only be set when you pick Any time as the timing option. It is a target, not a hard deadline:
Forms can still be submitted after the due date
No automatic chasing or auto-fail
The due date is purely a guide for whoever is meant to fill the form in
Overdue assignments are highlighted in red on the job's Forms tab
You can change or clear a due date at any time. On the job's Forms tab, click the Due date button on the assignment row to open a calendar, pick a new date, or click Clear due date to remove it.
For the four gated options (the clock-in/out and line-item ones), a due date is not used - the form has to be done at the gate.
Pausing an assignment (Deactivate)
If you need to stop a form gating clock-in/out, or hide an Any-time form from pickers, deactivate the assignment:
Open the job's Forms tab
Find the assignment
Click Deactivate and confirm
A deactivated assignment:
Is hidden from the Any-time form picker
Stops blocking clock-in, clock-out, or line-item actions
Keeps every submission ever made against it (the audit trail is preserved)
Shows a greyed-out Deactivated badge on the row, with a tooltip showing the date and who deactivated it
Can be Reactivated at any time
You cannot edit a deactivated assignment (the due date picker is locked). Reactivate it first.
Removing an assignment
What you can do depends on whether the assignment has any submissions yet:
No submissions yet → a Delete button is available. Use this to remove an assignment that was added by mistake.
One or more submissions → only Deactivate is available. Submissions are permanent, so the assignment record has to stay attached to the job to keep the audit trail intact.
Filling Out a Form
Forms are designed to be completed on the Trades Panel mobile app by the staff member doing the work. The web app is primarily used to build templates and review submissions.
Where to find your forms (mobile)
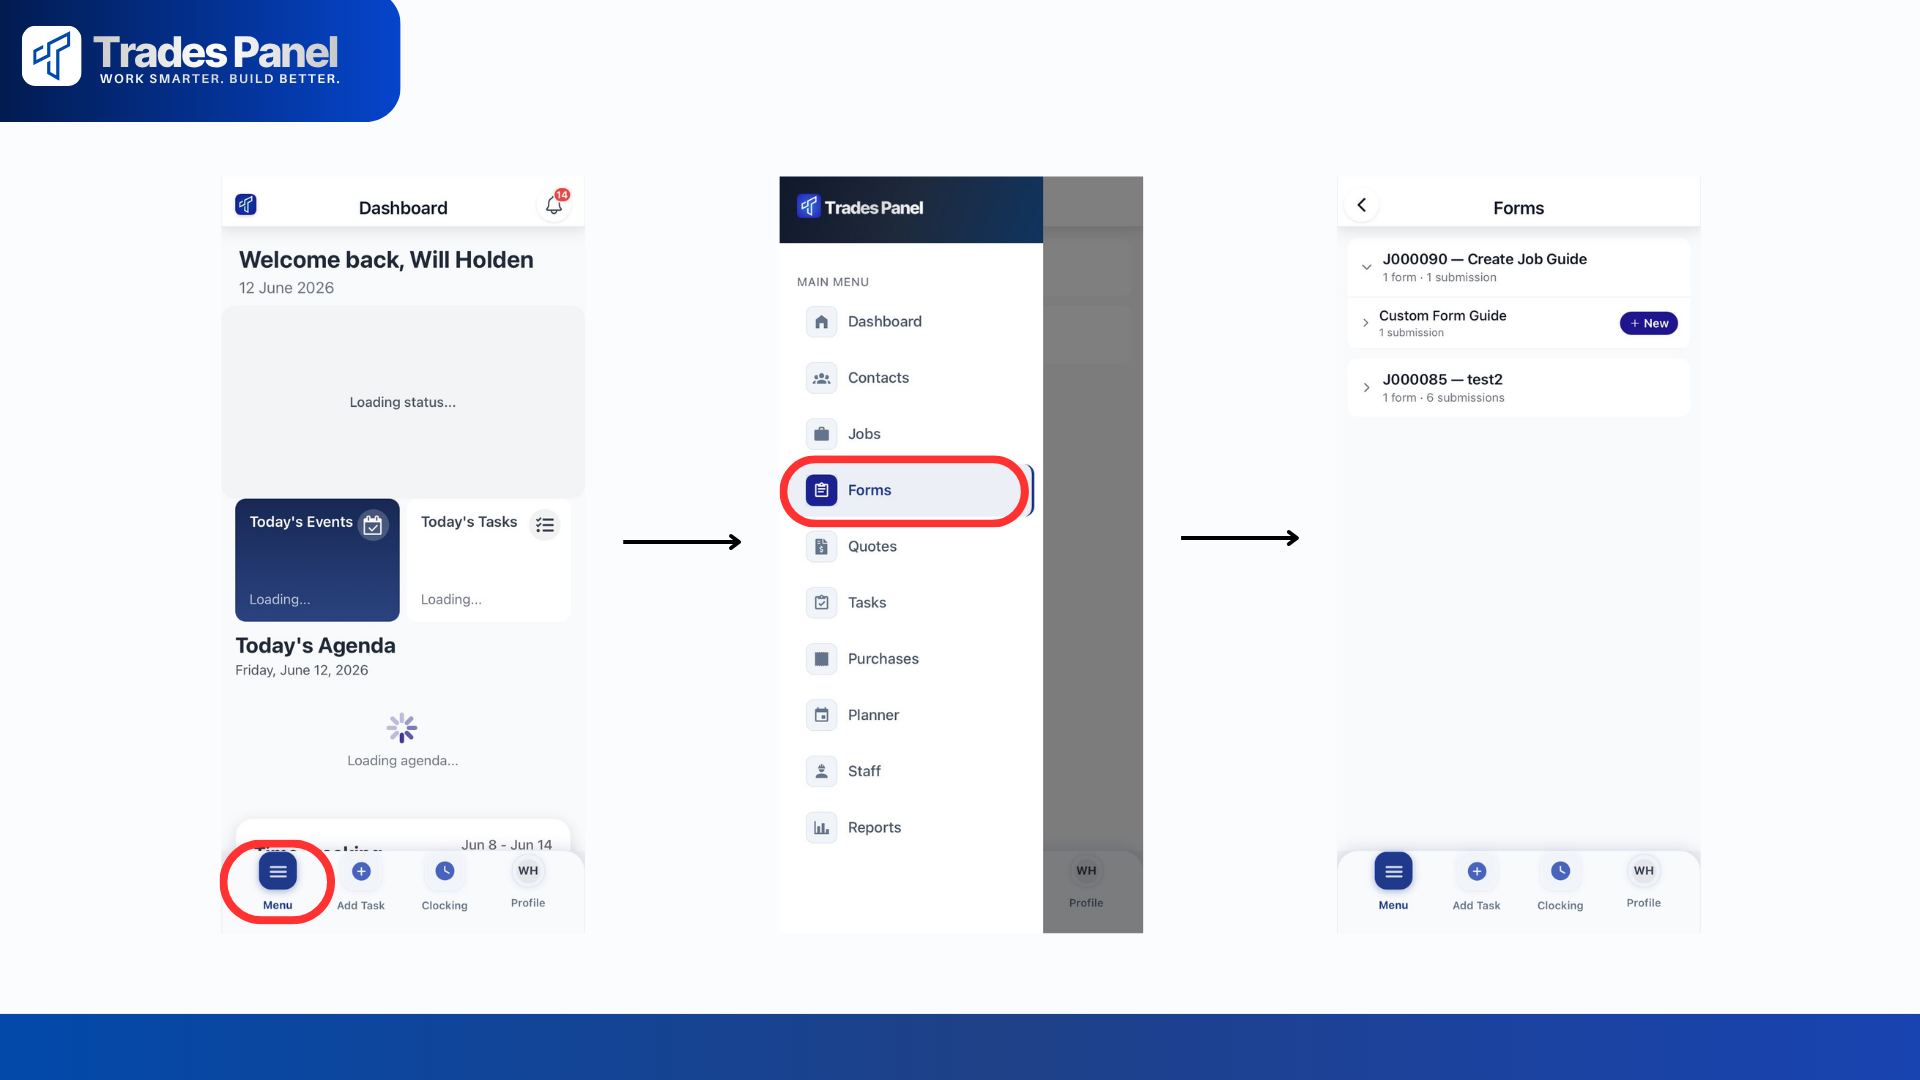
Open the mobile app
Tap the Forms tab
You will see every Any-time form on every job you are scheduled on, grouped by job
Tap a job to expand it, then tap an assignment to see its submissions
Note. Only staff who are assigned to at least one line item on the job will see the Any-time forms in the Forms screen. For more on assigning staff to parts of a job, see the Scheduling and Assigning Work guide.
For gated forms (any of the four options that block clock-in, clock-out, or line-item actions), you do not need to go looking - the form is presented to you automatically the moment you try the action that triggers it.
Starting a new submission
Any-time forms: open the assignment and tap New to start a fresh draft
Gated forms: tap Clock In, Clock Out, Start Line Item, or Mark Complete - the form opens automatically
If more than one gated form fires at once (for example, two Before every clock-in forms on the same job), you will see them as a step-by-step screen with a progress indicator like "2 of 5". Submit each one in order to move to the next. The original action (clock-in, clock-out, etc.) only goes through after every form has been submitted.
Filling in fields
Each field type behaves the way you would expect:
Text / Textarea / Number / Date: standard input. The right keyboard or picker opens automatically
Select / Multi-select: tap to open a picker; choose one (or many) options
Checkbox: tap to toggle
Photo: tap to choose Take Photo (opens the camera) or Choose from Library. Tap and hold a thumbnail to delete it
Worker Signature and Client Signature: tap Sign, draw your signature on the pad, enter the signer's name, and tap Save. On mobile, your GPS location is captured and stored with the signature for audit
Section: just a visual divider - nothing to fill in
Saving your progress
Warning. Your progress is held in your phone's memory while you fill the form in. It is not saved to the server until you tap Submit. If you close the app, back out of the form, get a phone call that takes you out of Trades Panel, or your battery dies, the draft is lost. Local draft saving is on the roadmap.
For long forms, fill them in to the end in one go. If you need to pause partway, fill in what you can, mark the form as "in progress" in the notes, and submit. You can always edit and resubmit if the form comes back rejected.
Submitting
Tap Submit at the bottom of the form
The system checks that every required field is filled in. If any are missing, you will see a list of what to complete
Once all required fields are valid, the submission is sent
If the template has Require office review turned on, the submission status becomes Submitted and waits for review
If Require office review is turned off, the submission is auto-approved on the spot
You will get a notification when your submission is approved or rejected.
Resuming a rejected form
If office staff reject a submission, you will get a high-priority notification (in-app bell, push, and email depending on your settings). Tap it to jump straight to the rejected submission. The rejection notes will tell you what needs to change. Edit the form and tap Submit again. There is no limit on how many times a form can be rejected and resubmitted.
Reviewing Submissions (Office Staff)
If a template has Require office review turned on, every submission needs an Owner, Admin or Office Staff member to approve or reject it.
Where to find submissions
There are two views:
Per-job view: open a job and go to the Forms tab. You will see every submission against every assignment on that job
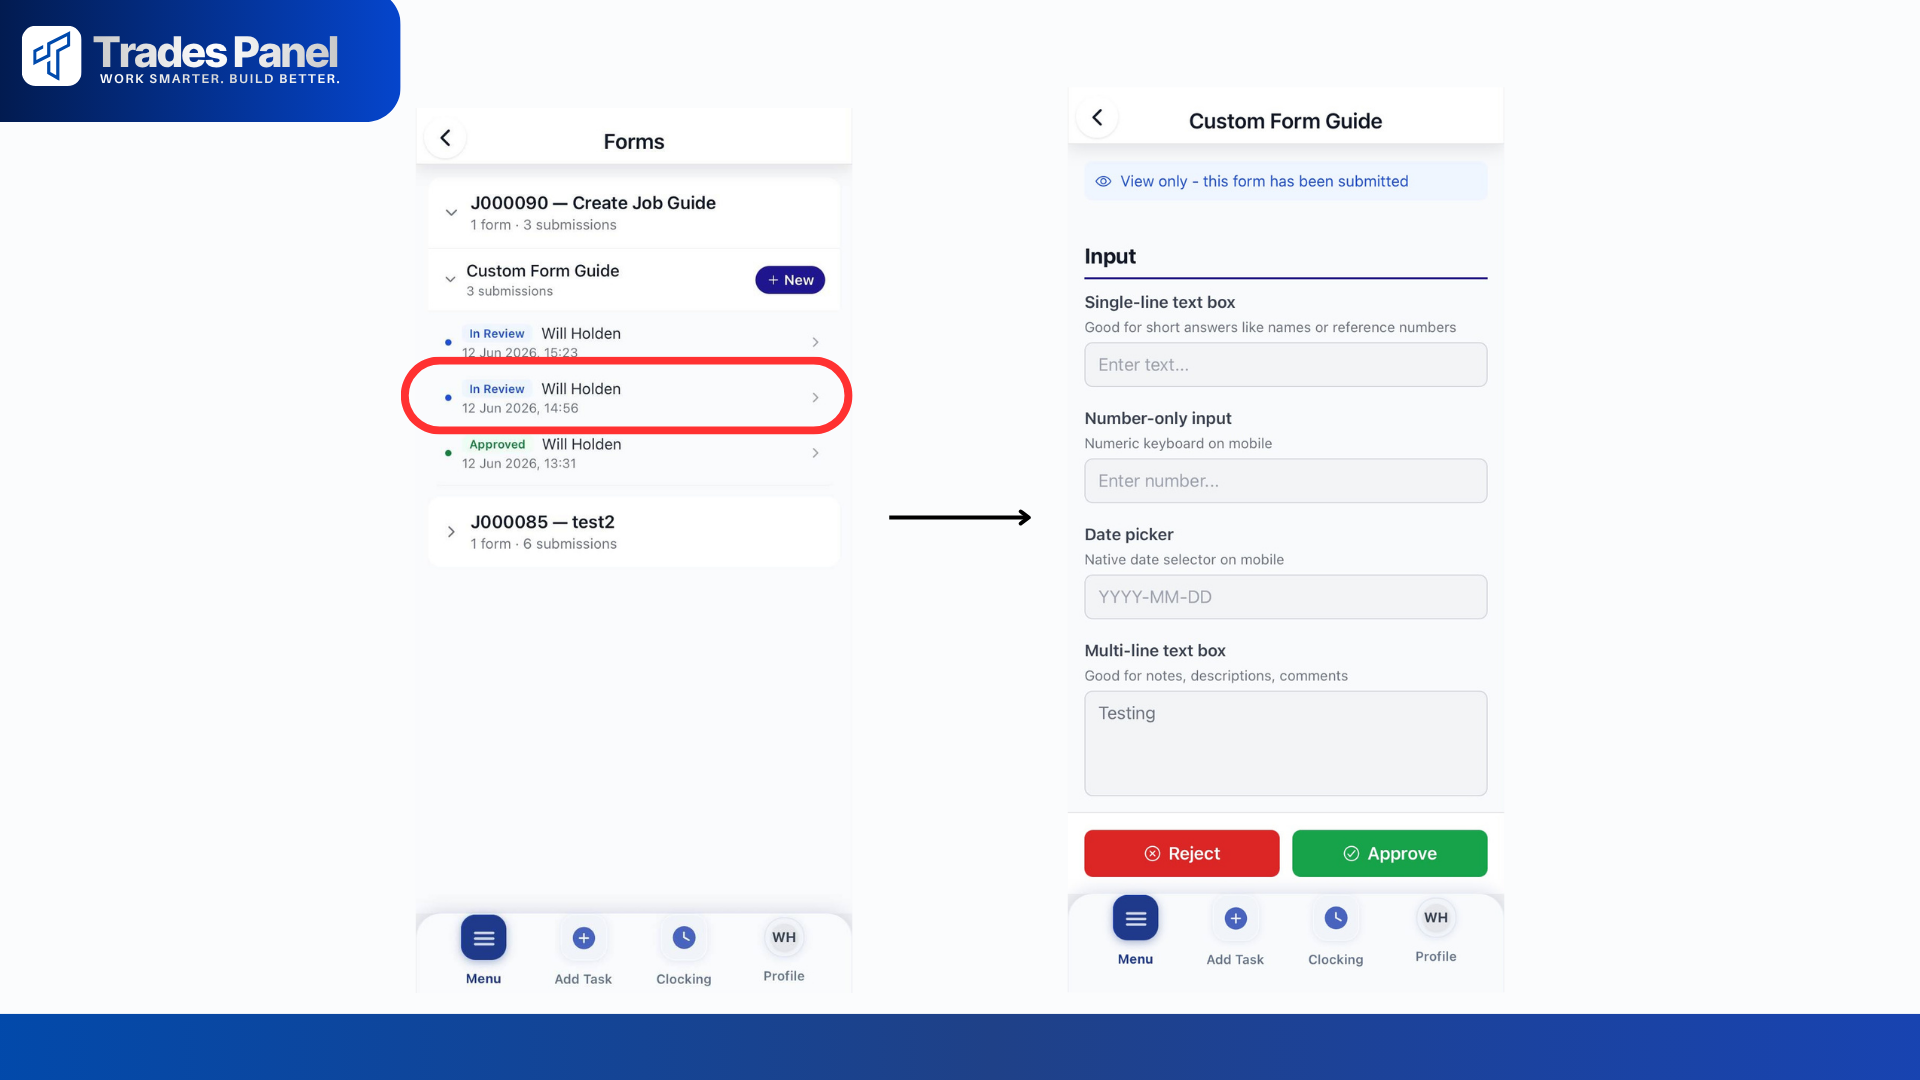
Global view: in the web app, open Form Submissions (top-level page). This shows every submission across every job, grouped into three collapsible sections:
In Review (status: Submitted) - waiting for you to approve or reject. Expanded by default
Rejected - submissions you have rejected. Expanded by default
Approved - submissions you have approved. Collapsed by default
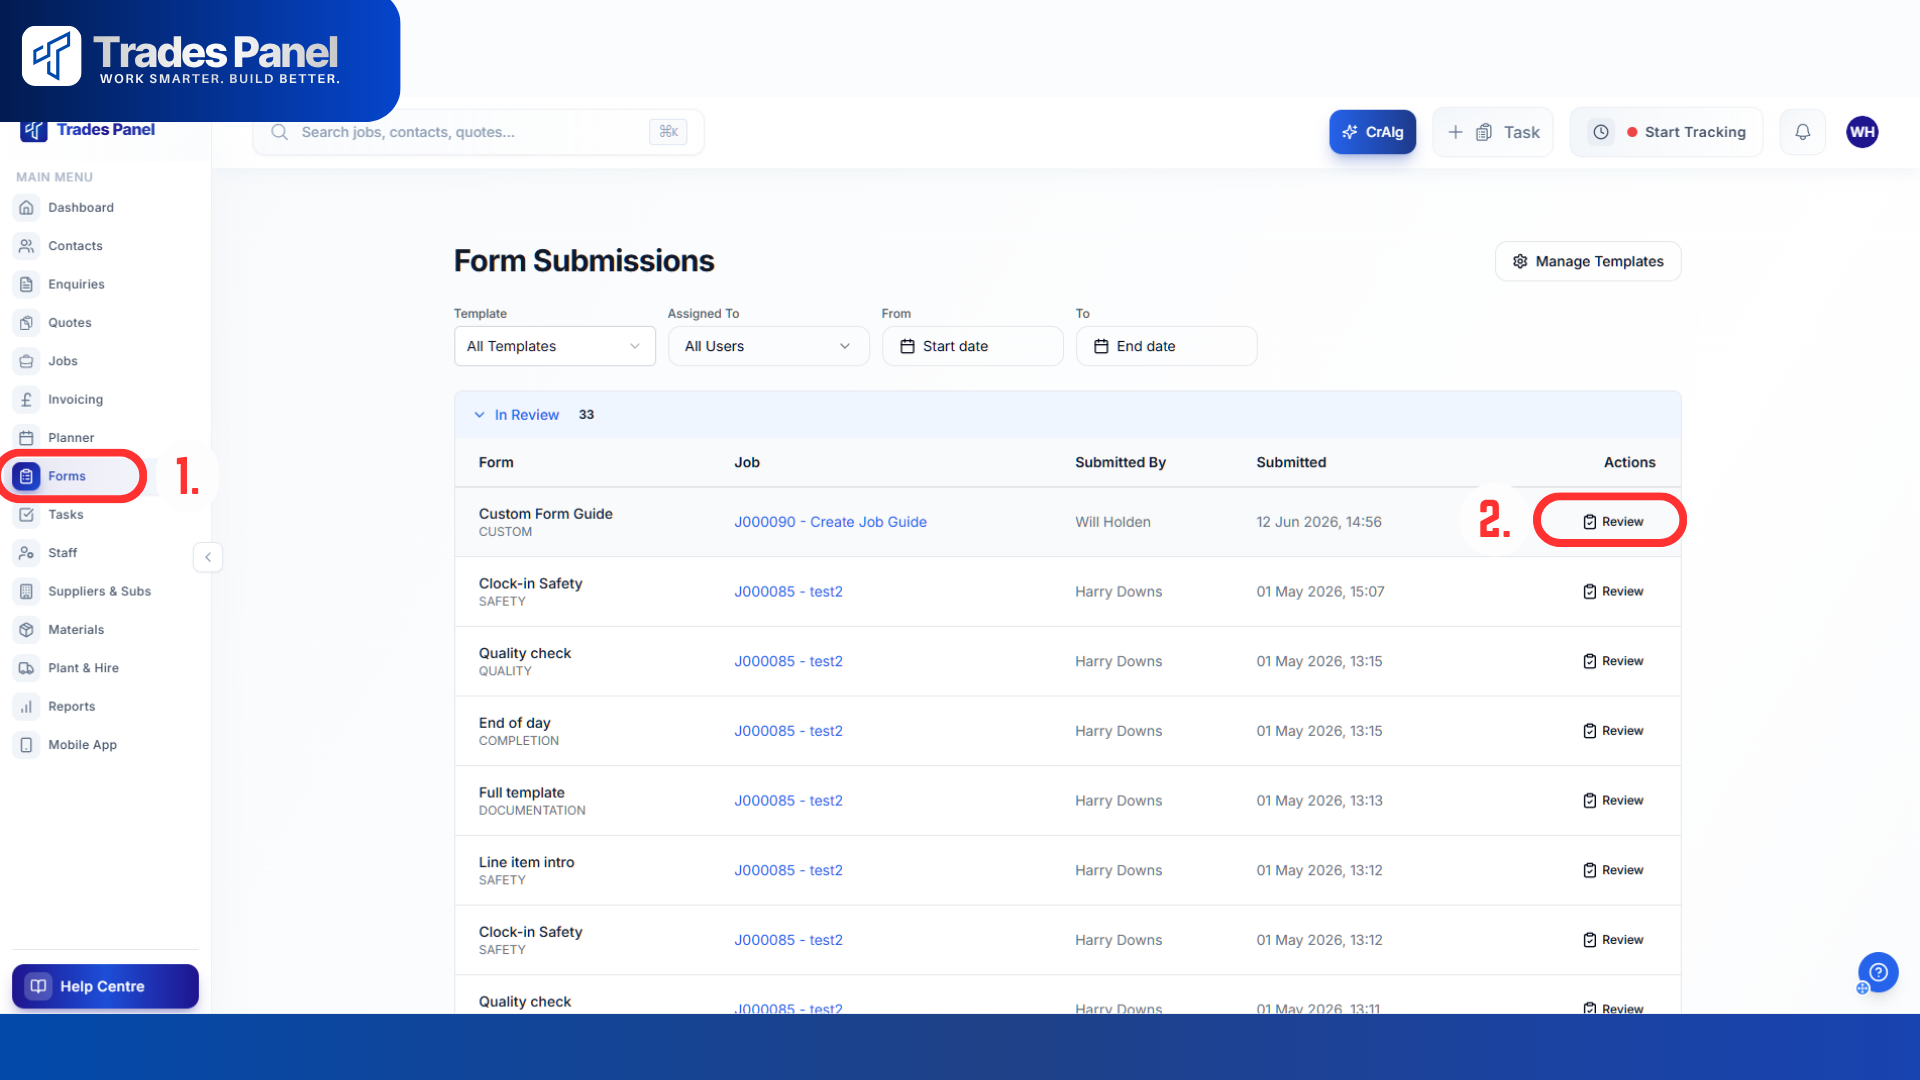
The global view has filters for:
User (who submitted)
Template (which form)
Date range (from and to)
Drafts that have never been submitted do not appear in office views.
Approving a submission
Click Review on a row in the In Review section
A dialog opens showing the full form with every answer, photo, and signature
Click Approve
The submitter gets a notification that their form was approved.
Rejecting a submission
Click Review on a row in the In Review section
Click Reject
Type a clear note explaining why - the submitter will see this and use it to correct the form
Click Confirm Reject
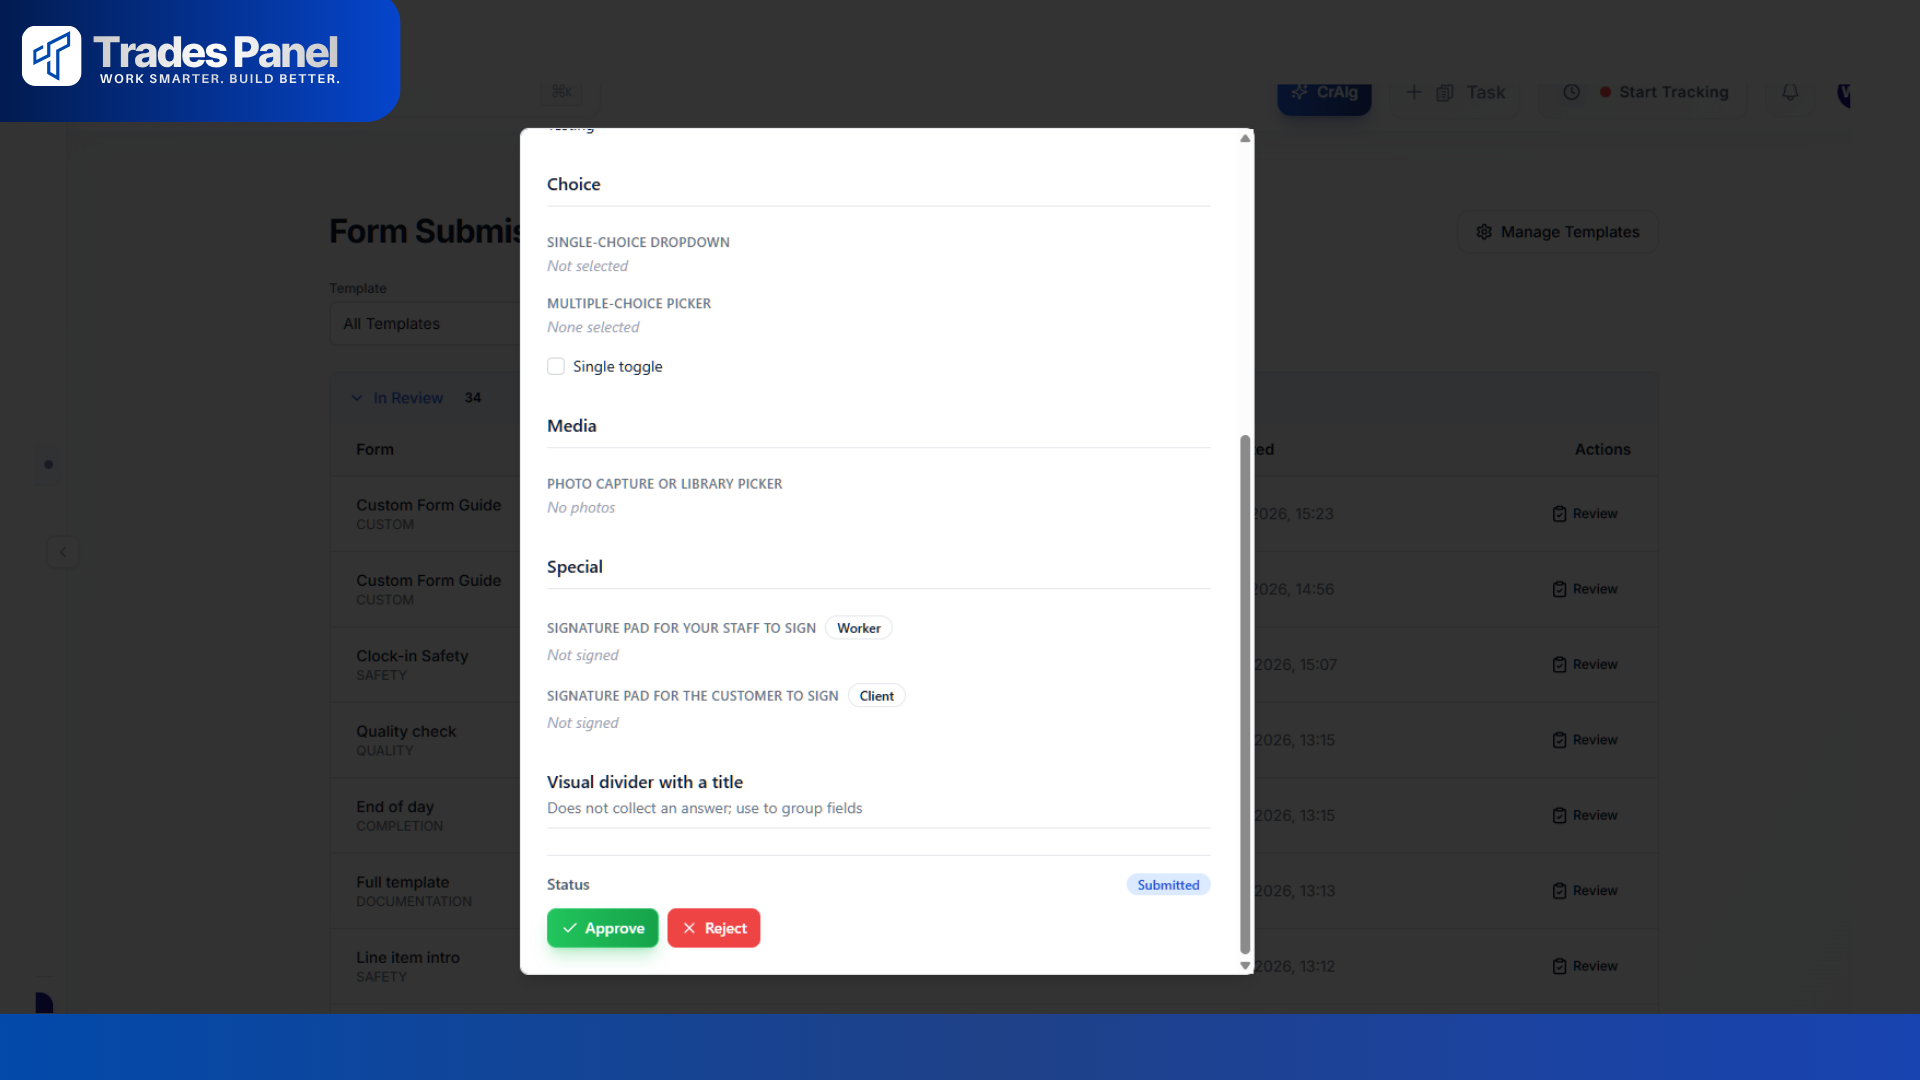
The submitter gets a high-priority notification with your rejection note, and the form goes back to Draft for them to edit and resubmit.
If your account uses notifications, rejection notes are emailed and pushed to the submitter's device.
Notifications
You don't have to set anything up - notifications fire automatically the moment you start using forms.
Event | Who gets notified | Priority |
|---|---|---|
A form is assigned to a specific user | That user | Medium |
A submission is sent in (and Require office review is on) | Account Owners and Admins | Medium |
A submission is approved | The person who submitted it | Medium |
A submission is rejected | The person who submitted it | High |
Notifications appear in the bell menu in the app, and (depending on the user's notification preferences) by email and push notification.
Tips and Best Practice
Start with one Active template, not ten Drafts. Build one form, use it on a live job, then tweak. It is faster than trying to perfect it on paper first
Use Categories. They make the templates list scannable when you have a lot of forms
Use Section Headers liberally. A long form with clear section breaks is much easier to fill in on a phone than a wall of fields
Be specific with field labels. "Photo of meter reading (front of property)" is much better than "Photo"
Use Worker Signature for your team, Client Signature for the customer. The two are tracked separately and shown that way on the submission, which matters for sign-off paperwork
Be careful with gated options. A form on Before every clock-in blocks the team from working until the form is filled in. Test it with a single user before rolling it out to a full crew
Have an admin's number to hand. If a gated form turns out to have a problem in the field, your whole crew is locked out of clocking in until an admin deactivates the assignment. Make sure someone on site can reach an admin
Duplicate before redesigning. If a template is in heavy use and you want to change it significantly, duplicate first so the live version keeps working
FAQ
Can I attach a form to a Job Item or a Line Item instead of the whole job? Forms attach to jobs only. To target a specific line item, use the Before a line item is started or Before a line item is marked complete timing option - the form will appear at the right moment on each line item on that job.
Can the same form be assigned to a job more than once? Yes, but only under different timing options. For example, the same Daily Safety Check can be added on Before every clock-in and Any time on the same job. You cannot add the same template under the same timing option twice.
Can I edit a template that is already live on jobs? Yes. Edits apply to every assignment using that template. If you do not want that, duplicate the template first and assign the new copy to future jobs.
What happens to submissions if I archive a template? Existing submissions are kept and remain viewable. Existing assignments still work. You cannot create new assignments from an archived template.
Can I export submissions as PDF? A one-click in-app PDF download is on the roadmap. In the meantime, submissions are viewable in the web app and mobile app with every answer, photo, and signature rendered in full, ready to screenshot or send.
Can the same form be assigned to more than one person? The assignment itself is at the job level, so anyone with access to that job can complete the form. There is no separate per-person assignment.
Does any of this work with subcontractor accounts? Yes. When you sync a job to a subcontractor's Trades Panel account, the form templates and assignments on that job are copied across with the job. The subcontractor can complete forms on their own account, and their submissions sync back to yours so your office staff can review and approve them. Templates flow contractor → subcontractor; submissions flow subcontractor → contractor.
Can I make a form recur automatically (for example, every Monday)? There is no time-based recurrence. The closest equivalent is Before every clock-in or On every clock-out, which trigger the form every working session.
What happens if a form is submitted after its due date? Nothing automatic. The due date on Any-time forms is a target, not a deadline. The submission goes through as normal.
Can I delete a submission? Submissions are permanent for audit reasons. If a submission was sent in by mistake or has incorrect data, reject it with a rejection note and ask the submitter to correct and resubmit.
Can field staff see all submissions, or only their own? Field staff can only see submissions they sent in themselves. Office staff and above see everything.
Can the customer sign without downloading the app? Yes. Hand them the phone, open the form with a Client Signature field, and they sign on the screen. They do not need a Trades Panel account or any app of their own.
Will the HSE or my insurer accept these as records? Submissions include every answer, photo, the signer's name, the signature image, and a timestamp. On mobile, signatures also carry the GPS location they were captured at. That is the same evidence you would have on a paper form, in many cases stronger. Whether your specific insurer or HSE inspector accepts them is between you and them, but most do.
Will this cost extra? Custom Forms is included in Trades Panel. There is no per-form or per-submission charge.
Troubleshooting
"The template I want is not in the Add Form picker."
Check the template's status. Only Active templates appear in the picker
If the template is archived, go to Settings > Form Templates, set the Status filter to Archived, find the template, and click Restore
"I keep getting a duplicate error when I try to add a form."
A form with the same template and the same timing option is already on this job. Either edit the existing assignment, or choose a different timing option
"The form is not appearing for the field staff member."
Confirm the staff member is scheduled on the job - the Forms tab on mobile only shows jobs they are scheduled on
Check the assignment is not deactivated (deactivated assignments are hidden from pickers)
For gated forms, confirm the staff member is actually trying the action that triggers the form (clock-in, clock-out, etc.)
"Clock-in is blocked and we cannot work."
A form set to Before every clock-in is in place on the job. Either fill in the form to unblock the clock-in, or have an Owner, Admin, or Office Staff member deactivate the assignment from the job's Forms tab if it was added by mistake
"I cannot edit an assignment - it says it is frozen."
The assignment has been deactivated. Reactivate it first, then edit
"I cannot delete an assignment."
The assignment already has at least one submission against it. Submissions are permanent, so the assignment can only be deactivated, not deleted
"My draft disappeared when I closed the app."
Drafts on mobile are held in memory only until you tap Submit. If the app closes or you back out of the form, the draft is discarded. Submit even partial information rather than leaving the form open
"I rejected a submission by accident."
The submitter will see your rejection note, edit the form, and submit again. There is no limit on resubmissions, so this is recoverable
Worked example: setting up a Daily Safety Check that blocks clock-in
Here is the full path from "nothing built" to "every clock-in needs a safety check signed off".
1. Build the template (Owner or Admin, on web)
Settings > Form Templates > Create Template
Name:
Daily Safety CheckCategory: Safety
Add a Section called
Site conditionsAdd three Checkboxes:
Walkways clear,PPE worn,First aid kit on site(set each to Required)Add a Section called
Today's risksAdd a Textarea:
Specific hazards today(Required)Add a Photo field:
Site condition photo(Required)Add a Worker Signature called
Operative sign-off(Required)Open Settings in the builder - leave Require office review on if you want to spot-check; turn it off if you trust the team to self-sign and you only want a record
Set Status to Active
Save
2. Assign it to a job (Owner, Admin, or Office Staff, on web)
Open the job > Forms tab > Add Form
Search
Daily Safety Check, click itPick Before every clock-in
Click Assign Form
3. The team's experience (Field Staff, on mobile)
The next time anyone on the crew taps Clock In on that job, the Daily Safety Check pops up automatically
They tick the boxes, type the day's hazards, take a photo of the site, sign their name
Tap Submit - clock-in goes through
If they try to clock in again later (lunch break and back), the form pops up again
4. Review (Office Staff, on web)
Open Form Submissions in the top nav
The day's safety checks land in In Review
Click Review on each one, Approve if the answers and photo look right, or Reject with a note if anything is missing
That's the whole loop.
Found something missing or unclear? Please contact support - we update these guides as the product evolves.